Search This Blog

Showing posts with label Lime. Show all posts

Sunday, 26 December 2021

Christmas Dinner Burritos

One thing my girlfriend and I have tried to do each year is make Christmas Dinner a little different. I've yet to complete a post about Christmas 2016's festive Salmon En Croute with Mixed Veg, which we prepared for my folks when we stayed with them for a couple of nights over the festive season, and last year's turkey burgers were a bit of a disaster because I'd foolishly assumed that a burger should be 100% meat, regardless of the type of meat.

This year, we didn't need much discussion to decide on our alternative Christmas meal style. I'd been considering burritos for some time before Courtney even brought up the subject of making Christmas dinner plans, so that was my first suggestion... and she agreed straight away. I then started researching options for Christmas-appropriate rice as part of the filling, while Courtney looked into seasonal 'slaw recipes. She opted to use What The Cluck? from The Vegetarian Butcher, while I picked up a couple of packs of Bernard Matthews turkey chunks. In place of a salsa, we both agreed that a dollop of cranberry sauce would be reasonably appropriate, and so the plans were in place.

For the rice, I came up with a shortlist of three existing recipes from around the internet:

After due consideration, the Festive Rice option was selected, but was prepared in a pan, on the hob, rather than by baking, the 1/4 cup of butter and the mint were both entirely omitted, while the Feta was added to the burrito rather than incorporated into the rice mix. Courtney's 'slaw was a mix of red cabbage and red onion (both sliced quite thinly) with pomegranate seeds, as well as lime and orange juice, seasoned with a little salt and pepper. She'd intended to also add some chopped Brussels sprouts - which she'd bought especially - but it slipped her mind at the time.

Now, since we all know that turkey tends to be a bit on the bland side, and mixing up some gravy for the purposes of a burrito seemed rather pointless and wasteful, I figured I'd heat it up in a pan after coating it with Peri-Peri Salt. This involved just dumping a bit of sunflower oil into a small frying pan and then chucking the coated turkey chunks in once it was heated up and stirring them about till they started to brown in places. I somewhat underestimated how much oil I'd need, which led to small pieces of turkey adhering to the pan, but it worked well enough aside from that.

Assembling the burrito was a simple case of serving out a portion of rice onto a tortilla (warmed for 10 seconds in the microwave to ensure they were flexible enough for filling and rolling), crumbling over some Feta, scooping over some cranberry sauce, then adding some of the slaw. Courtney further embellished her burrito with some jalapeños and coriander, but neither are particularly agreeable to me, so I just had to make do with the basic ingredients. As a finishing touch, the burritos were returned to the pan for a bit of browning, and to help seal the seam.

The end result turned out really well - we're both fans of burritos, but have previously tended to rely on supermarket-bought sets for making them, and we tend to omit staples like the rice, focusing instead on the seasoned meat (or meat substitute), packed-in salsa, some sour cream and, at most, a home-made guacamole. Having a somewhat seasonal rice recipe, further spiced up by the Peri-Peri Salt, then sweetened by the fresh pomegranate, it was a comparatively light and sweet burrito, but filling nevertheless. This was also probably the first time we - or I, at least - have tried to properly roll our burritos rather than turn them into makeshift tubular pockets. I had to look up a couple of YouTube videos for the technique, and still got a bit confused, to be honest.

All in all, this is one of the most successful 'alternative Christmas' ideas we've had so far, yet it's still ripe for exploration into alternatives. I'm particularly keen to try the Puerto Rican Rice option - I felt that was probably the best fit for a burrito, albeit at the risk of overpowering everything else, but that was a risk I was willing to take with Bernard Matthews turkey chunks - and, having thought about it a little more, I'm wondering if mixing up a little gravy for the turkey wouldn't be such a bad idea after all.

We have sufficient leftovers of the rice and slaw for a decent dinner tonight, as well... I'm considering some Boxing Day 'sushi' using some sliced salmon I picked up a few days back, along with some Christmas spiced streaky bacon acquired in Iceland... Hopefully will be adding a few photos of that in the next few days.

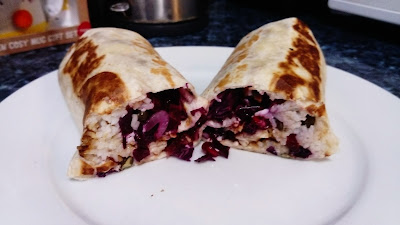
I'll leave you with a Binging With Babish-inspired cross-section, with apologies for the quality of the photo, as it was taken quite hurriedly, on my phone:

Wednesday, 30 May 2018

Experiments with Gousto #7: Crispy Baked Tacos, Refried Beans & Pineapple Salsa

Apologies for the delay in following up the continuing experiments with Gousto - it's been a good couple of weeks since I cooked the last of this latest batch (and ate all of it myself, as my girlfriend was away for the weekend). There's no particular reason for the delay, I just haven't felt like writing about my cooking efforts lately.

Not that they went badly (until the last one - but more on that when I get to it), just that I've been trying and failing to get all kinds of things done, and I wanted to give this the attention it deserved, rather than bashing out three perfunctory posts. This was, I think, the first recipe for the relevant week that my girlfriend and I flagged as a definite choice. Everything on offer looked great, but we're both big taco fans, and we'll often make the fillings from scratch anyway, so this wasn't a massive departure from the sort of thing we've made in the past, just a specific recipe we hadn't tried yet.

The first thing I need to say about this recipe is that it really needs some way of ensuring the tortillas keep their shape during the baking. I spent quite some time trying to even up the distribution of the tortillas in the dish, and ensure they were as close to U-shaped as possible, only for them to curl up, flop over and basically do their own thing in the oven. This led to several of the tortilla/tacos being very difficult to fill when the time came, and at least one had to be cracked to get it open far enough to drop in the refried beans. The salsa, being quite chunky, proved even more tricky.

On the whole, preparing this one went smoothly and was fairly easy - the 30 minute estimate is probably quite accurate though, as usual, I did a lot of prep work ahead of time. The salsa was the first thing I made up, since it required only chopping, mixing and then keeping aside until it was time to dish up. The cherry tomatoes and pineapple rings only needed to be chopped roughly, which is always a good thing in my books, as chopping finely is something I have still yet to master. Next time I do this, I'll probably quarter them as halves are a little too chunky... and, to be honest, I'm not sure cherry tomatoes were necessary, as normal tomatoes could be more easily chopped into smaller pieces while remaining suitably chunky. I'd also query the necessity of adding a teaspoon of juice from the tin of pineapple because, unless the chunks are fully drained, they come soaked with quite enough juice for a reasonable salsa, and deliberately adding more just seemed to leave me with way too much fluid in my salsa - it includes a tablespoon of olive oil as well, after all.

The only really substantial task in this recipe is making up the refried beans, which is surprisingly simple... So much so, in fact, that I may take to doing it more often, since my girlfriend and I both like refried beans. The specifics of the process, as dictated by Gousto, seem a little strange to me - adding the dry stuff (smoked paprika, ground cumin and chilli flakes) before the chipotle paste, tomato frito and the hundred millilitres of water was more than a little counterintuitive as the powders tended to clump rather than properly mixing in with the beans. I think I ended up cooking the beans for longer than the 5-8 minutes suggested, but I'm still not entirely sure what constitutes "a medium heat" on my hob, and probably spent too long adjusting it up and down, according to how it seemed to be going. The final stage - adding in the lime juice, seasoning and following the instruction to "gently crush a few of the beans" - is very much a personal taste thing. When ordering refried beans in a restaurant, you can expect anything from a full-on bean mash to something where the individual beans are still easily discernible... The photos on the recipe card seemed to suggest a middle ground, slightly beyond the "gentle" crushing of "a few of the beans" the text described, so I just aimed to mash them up to the exteny that I, personally, prefer.

I do feel obliged to quibble the quantities, as a single tin of beans (plus the other stuff) ended up equating to approximately half the quanity of refried beans I would want to divide between six tortilla/taco shells... perhaps that just proves what a porker I can be but, like I said, I really like refried beans. Put it like this: The first three tacos each received a heaped tablespoon of beans... after that, I had to start getting stingy and, by the last taco, I was literally scraping the bottom of the pan for a decent portion.

As mentioned, actually transferring the beans into the part-cooked tortillas was troublesome, and I think what's really needed is a sort of toasting rack, where the tortillas can be wrapped around a framework to ensure they keep the optimal U-shaped-ness for the 5-minute initial bake. Once done, these can be transferred to the oven-proof dish to be (ahem) filled with the refried beans, and returned to the oven for the final 5-minute bake.

Given that - as mentioned at the start - the salsa was rather more fluid than it needed to be, the finished and garnished tacos were somewhat flooded, and really didn't need any additional lime juice to be drizzled over. Portion-size aside, though, the tacos were very tasty, and I'll definitely be giving this recipe another try at some point.

One huge advantage to this sort of thing is that the recipe for refried beans is so easy to embellish - more or less of the herbs or the chilli flakes, dark chocolate could be added, pinto and/or kidney beans could be used along with the black beans, etc - so the possibilities in that alone are virtually endless. I'll certainly double the quantity of beans next time, even if I don't add another variety. I'll likely chop the pineapple a little more, use normal tomatoes rather than cherry, and absolutely not add any additional juice. A standard onion - brown or red - could be used in place of, or as well as the shallot, too... so, really, this whole recipe encourages experimentation.

Aside from the frustrations caused by the uncooperative tacos, this was great fun to prepare and, being very simple, could easily become a go-to, either in and of itself for a quick veggie meal, or as a component of a more diverse, Mexican-themed dinner, since both the refried beans and the salsa could be served on the side.

One sidenote is that, where a recipe card states, for example, "this is your pineapple salsa", I've previously been inclined to read an emphasis on "your", because it's often come straight after the bit about seasoning... Looking at this particular recipe card, I suspect I have done so in error, as this seems to be more matter-of-factly stating "this is your x" by way of saying "this portion of the recipe is concluded".

Puzzling...

Sunday, 3 November 2013

Feta & Griddled Peach Salad (BBC GoodFood '101 Veggie Dishes' Recipe)

This one may sound a bit weird, but bear with me. It was actually one of the first recipes my girlfriend and I tried from BBC GoodFood's '101 Veggie Dishes' book, but I completely forgot to write it up and left it aside for months on end. Oddly, I cannot find this exact recipe on the GoodFood website (the two recipes that are up there both include chicken in one form or another), so hopefully I can get away with listing the ingredients and details of how it's made. We didn't follow the recipe precisely as specified anyway (it was written to serve four!) and it's not as if I'd be reproducing it word-for-word...

Ingredients:
  • 1 Lime
  • 2 Peaches
  • 1 Red Onion
  • 1 Bag Mixed Salad
  • Approx 250g Penne Pasta
  • Approx 150g Feta
  • Fresh Mint (enough for approximately 1 tbsp once chopped)
  • 1 tbsp Olive Oil
Preparation Time: about 15 minutes

Tools Required:
  • Griddle Pan
  • Medium Mixing Bowl
  • Kitchen Knife
The Process:
Start the pasta off as per your preference. This should take about 10-12 minutes, so you can safely leave that going while getting on with other bits.

Cut the peaches into wedges and squeeze the lime juice over the pieces. Since I don't have a griddle pan, we had to make do with basically toasting our peach wedges under the grill. The peaches we picked up weren't especially ripe (typical supermarket stuff), so they didn't work out very well. They're meant to go on a high heat for only two or three minutes a side, which should leave them "nicely charred". This is probably easier to accomplished with a griddle pan and with ripe peaches.

Slice the onion thinly, cut the feta into manageable pieces and chop the mint. Mix them all together with the salad leaves, pasta and olive oil in your bowl. Serve up, topping with a little pepper if you wish.

The Results:
Mixing fruit with any kind of traditionally savoury dish always sounds wrong, but gammon has been served with pineapple for years, and my local pizza place offers both pineapple and peach as toppings, so maybe I need to open my mind to fruit in my main course.

This certainly turned out more pleasant than I was expecting. The mint softened the bite of the feta and rocket, either of which can be overpowering under some conditions. The pasta component was not a part of the original recipe, and was included here to bulk up the dish, as it just seemed a bit too light and salad-y... Though perhaps that's because we cut the quantities of the ingredients. We didn't mix everything up quite as well as we could, essentially ending up with a very layered salad topped with pasta and peach, but it's certainly a good dish to try during the warmer months of the year

Thursday, 12 January 2012

Salmon with Chilli, Ginger & Lime Sauce

The problem with some food advertising is that it gives me ideas...

Ideas that, were I to stop and think, would lead me to suspect I'm turning into something akin to those dangerous scientists from Sci-Fi stories. You know the type - too wrapped up in the discovery that something can be done to wonder whether it should be done.

Yes... Once in a while, the urge to try something wacky overcomes my basic need to prepare something quick and - above all - definitely edible, and I end up doing something completely stupid for dinner.

But I digress.

Recently, the Saucy Fish Company have been advertising quite a bit on television and, I have to say, their wares look very tempting. Not only do they sell sauces, they sell fish along with an 'ideal accompanying' sauce, including a range of 'cook in the bag' options, along the lines of Bird's Eye's 'Bake to Perfection' line. One of the options they describe in the advert is salmon with chilli, lime and ginger. I had one of those 'lightbulb moments', realising that I had some salmon in my freezer, some chilli peppers drying on my kitchen windowsill, a bottle of Waitrose lime juice in my fridge, and several sachets of 'Very Lazy' ginger paste in a cupboard. What could go wrong?

Well, based on that previous attempt at a ginger glaze that didn't glaze, quite a lot. But did I let that deter me?

Ingredients (quantities are approximate, and for roughly 1 serving):
  • Dried Chilli Pepper (about 1/4 of the pepper)
  • Very Lazy Ginger Paste (2 sachets)
  • Maple Syrup (2 tablespoons)
  • Lime Juice (3 teaspoons)
  • Salmon Fillet
Preparation Time: Approx 10mins to prepare the sauce, 15 minutes to bake

Tools Required:
  • Sharp Kitchen Knife
  • Small Dish or Cup
  • Stirring Implement
  • Kitchen Foil
  • Baking Tray
The Process:
Preheat oven to approx 200-210C (for fan assisted... about 230C if not). Cut approximately 1/4 of a dried chilli pepper into small pieces and mix in with 2 sachets worth of ginger paste. Add 2 tablespoons of Maple syrup and 3 teaspoons of lime juice. Stir thoroughly, till the resulting paste is smooth.

Lay the salmon fillet on enough kitchen foil to wrap around the fillet and cover it completely. Pour (or spoon) the sauce over the top, then close up the foil, place it on a baking tray, and stick it into the oven for about 10-15 minutes.

The Results:
Actually, this wasn't half bad. I did sneak a taste of the sauce before adding it to the salmon, just to see how it was coming along, and adjusted the quantities according to whatever I felt was lacking. It didn't glaze (even after sticking it under the grill for another couple of minutes, just as an experiment), but I suspect I should have used some kind of honey rather than Maple syrup. Alternatively, grilling for longer might have worked... certainly, the run-off had not only glazed, but started burning... which is vaguely promising.

This home-made sauce isn't as smooth or as clear as what I've seen of the Saucy Fish Co's version, and I - perhaps foolishly - didn't include any of the seeds in the sauce, so the chilli didn't have as much of a kick as it might have done, but this is certainly something I shall revisit and attempt to refine in future.

Saturday, 17 December 2011

Last Course: Off-Key Lime Pie

As previously mentioned, there is a vast gulf of difference between 'Key Lime Pie' and the things that are sold as 'Key Lime Pie' in supermarkets across the United Kingdom. Quite how cream ever became involved, I may never know (other than because we like our cream over here... Mmmmm, that full fat goodness!)... so why some insist on turning it into a cheesecake is, frankly, beyond baffling and into the realms of the frighteningly abstract. If Salvador Dali had been a chef, he'd have had nightmares about Key Lime Cheesecake.

What I aimed to do with this was recreate something akin to the traditional, Florida Keys recipe. Naturally, proper Key Limes were out of the question - they're hard enough to come by at the best of times but, right now, it's the middle of winter! Since I like my puns almost as much as I like my snacks, I figured calling it 'Off-Key Lime Pie' was a fun way to admit that it wasn't going to be quite right.

I decided to cut some serious corners with this first iteration, the idea being that I'd see how it turns out using bottled lime juice this time, and then revisit the recipe at a later date, and make it fresh. Also, Waitrose's ready-made Sweet Pastry Case was an absolute Godsend, because it meant no faffing about with rolling out pastry and finding a suitable tin to bake it in. The base actually has to be partly cooked ('Blind Baked' is the term) before the fillings go in anyway, so lots of time and effort were saved there.

Just to make this more fun, I made this while visiting my folks. There was no way I'd be able to eat the whole thing myself (no, really... 'Two-Puds' I may be... this is six, easily), and I figured it'd be easier to transport the ingredients than a finished pie... so I was working in a kitchen I'm not as used to as my own, and with both parents to-ing and fro-ing all the while.

Ingredients:
  • Waitrose Sweet Pastry Case
  • Condensed Milk (approx 325g to be used, so try to get a container of about that size. Carnation make one of 450g, which is what I used... but shop around!)
  • 4 Eggs - to be separated!
  • Essential Waitrose Lime Juice (1x 125ml bottle)
  • 1 Fresh Lime (for the zest)
  • Cream of Tartar
  • Vanilla Extract (I used Ndali's 'Intense')
  • Icing Sugar
Preparation Time: Approx 1hr 20minutes (before chilling in fridge), or 40minutes if using an electric whisk

Tools Required:
  • 2 Medium Bowls - one for the pie filling, one for the meringue
  • Whisk (this is one of those times when an electric whisk is helpful - it makes the meringue far easier!)
  • Grater (for the lime zest)
  • Measuring Implements - Condensed Milk is a liquid that is measured by weight, not volume, so scales are handy... US-style 'cups' can be quite helpful for some things: a half cup is the perfect size for the amount of lime juice and icing sugar used by this recipe.
  • Baking Tray or Cookie Tray
The Process:
Preheat the oven to 160C (140C for fan assisted). Carefully separate the eggs so you have the yolks in one bowl and the whites in another. A little white in with the yolks won't be too important, but yolk in with the whites will be troublesome!

Add 325g of condensed milk into the bowl with the yolks and lightly whisk. The simplest method for gauging how much to put in is to weigh the container full, then pour some condensed milk into the bowl and weigh the container again. Once the container is approximately 325g lighter, you're done. Grate in some of the lime zest and add the lime juice (gradually, so as to avoid separation), stirring in well. Leave this for about 10 minutes, as the interaction between these ingredients will 'cook' the mixture to some extent, and it should thicken up. Pour the thickened mixture into the pastry case.

Next up comes the meringue, which is basically a case of whisking the egg whites. A lot. Once it really starts frothing up, add about a quarter of a teaspoon of cream of tartar, which should help things along. Once you have a soft, light foam, add about 6-8 tablespoons of icing sugar, one spoon at a time, while you continue to mix. The rule of thumb seems to be that the meringue ready if pulling the whisk out results in a fairly firm 'peak'. As the foam begins to firm up, add one teaspoon of vanilla extract.

The meringue takes absolutely ages to make and requires a lot of elbow grease. I would like to mention (read: boast) that I did mine entirely by hand (OK, I let my father do some whisking when my arms started to ache, but I did lots at the beginning and lots at the end). While whisking vigorously, I noticed that making meringue could be turned into an almost-full-body exercise, as I found my legs were moving slightly some of the time... If you're not using an electric whisk, one useful trick is to roll the whisk handle between your palms, back and forth (anyone who's ever been in Cubs or Scouts will recognise this as the traditional technique for making fire, using two sticks of wood), as this gives you something close to the effect of an electric whisk.

Scoop the meringue onto the lime mixture in the pie case, then scatter over the remaining lime zest. Put the pie onto a baking tray or cookie tray and bake for about 10 minutes. Note that, if you're not using a fan-assisted oven, you may need to turn the pie round halfway through to ensure an even cook. Cool slightly before chilling in the fridge, then serve chilled.

The Results:
As is traditional with this blog, I shall discuss the things I got wrong on this first attempt:
While I have noted temperatures of 160C/140C above, when I went researching Key Lime Pie, temperatures of 200C were recommended, and so that's more or less what I used. The end result was that the pie filling wasn't as well-set as it should have been and the meringue was rather more than 'golden brown'. Also, since the oven I used this time is not fan-assisted, there was a visible graduation in browning from the back (very brown) to the front (basically still white) of the oven, because I did not turn the pie halfway through.

Also, the quantities listed, while good, are perhaps a little excessive for the Waitrose Sweet Pastry Case I used. The lime filling was damn near overflowing before the meringue went on! There was also rather too much meringue but this 'problem' was solved by dolloping the excess onto a sheet of greaseproof paper, and baking some small meringues. I suspect that 3 eggs with a correspondingly reduced amount of condensed milk (and lime juice?) would have been preferable.

But, of course, the proof of the pudding is in the eating...

And I have to say, despite setting the oven too high and having too much of everything, this turned out to be an amazing home-made dessert. One 125ml bottle of lime juice seemed to be the perfect quantity - the filling was smooth, but with a subtle citrus sharpness and a good lime flavour, and the meringue softened it nicely. I will say that Waitrose bottled juice (from concentrate) probably didn't work as well as freshly squeezed lime juice would, so I'm very keen to revisit this and do it 'properly' sometime soon. The lime zest in the pie adds a nice bit of texture and extra little hits of lime flavour, but the overall experience was smooth.

I don't think vanilla extract was traditionally an ingredient in the meringues my family used to make, but it really does boost the flavour, so I shall certainly remember it for my future efforts. It gives it almost a toffee-like hint - a single teaspoon really goes a long way. Also, I believe that electric whisks, while convenient, never quite manage the light, fluffy consistency you get from putting in the time and effort with a hand whisk.

Some other, similar recipes (such as Lemon Meringue Pie) tend to suggest baking the pie briefly before adding the meringue, then reducing the temperature for a final round of baking. I think I'll give that a shot next time: 10 minutes at 160C (140C fan-assisted), then cool and chill, then add the meringue and cook for another 10 minutes at 140C (120C fan-assisted).

For a first attempt at something quite daring (for me!), this really was quite amazing. I was very worried about separating the eggs - never having done it before - but it turned out to be reasonably easy, even with my mother watching over my shoulder for the first couple of eggs. In retrospect, I think I'd like to have taken advantage of the electric whisk, but making this entirely by hand was a very rewarding experience, even if it did leave my arms aching!

And, since I am so proud of this... Have some photos!
Note that the pie filling is yellow, not green... then compare and contrast with any alleged 'Key Lime Pie' you find in the shops. Home made pie wins.

Addendum 9/1/2012:
Remade this using only 3 eggs, 245g of condensed milk, the juice (and pulp!) from 3 fresh limes and the grated zest from 2. The end result was better, not least because I actually used the settings detailed above, rather than those I initially found in my research. The filling was rather more solid... or jelly-like, rather. The meringue was perhaps a little underdone, but was soft and light. Flavour-wise, it wasn't much different from the original... perhaps a touch less acid. I'm not sure the addition of actual lime pulp made much of a difference to the pie but, overall, I have to recommend the fresh version over the one made with 'lime juice from concentrate'.

No surprises there, I guess...

Pictures, you ask? Why, certainly...
It's obvious that the filling has worked better this time round, but whether this is due to the lower cooking temperature or the use of fresh juice, I don't know... Probably a mixture of both.

Volume-wise, it's nowhere near overflowing the case, like the first one. I'm honestly not sure that's an improvement. Also, even with only three eggs, there was still far too much meringue. I tried using the remainder to make some separate meringues but, again the times and temperatures I found online were utterly wrong, and the results were still soft and sticky.

I still ate them all, though...

Come on, what kind of fool do you take me for?

Wednesday, 14 December 2011

Last Course: Waitrose Key Lime Pie

Some years ago, I took a holiday in Florida, so it should come as no surprise that I've sampled Key Lime Pie that was actually made in the Keys.

With that in mind, it should also come as no surprise that most things I've found in the shops labelled 'Key Lime Pie' are but pale imitations of the true dessert.

Many of them are topped with rather too much cream. Many of them use a very obviously artificial colour to emphasise that it's Key Lime Pie ("it's all green and stuff, innit? Limes!"). There are those that are too sweet, there are those that are too bland. There are very few that follow the Conch tradition of adding a meringue topping.

Because that would be too much like Lemon Meringue Pie, wouldn't it?

Flavour-wise, Waitrose version is a fairly decent stab at a Key Lime Pie. It has a good, crunchy, biscuit crumb base (described as 'gingercrumb', though I cannot comprehend why - it doesn't taste gingery, and nothing obviously gingeresque is listed in the ingredients), and the lime mousse is subtly flavoured, yet has bite and doesn't have the unpleasant aftertaste one often finds in products claiming to be 'Key Lime Pie'.

But, other than the flavour, it really isn't Key Lime Pie by any stretch of the imagination. Alongside the condensed milk required by the traditional recipe, this thing contains double cream, crème fraîche and full fat soft cheese... So it's basically a lime cheesecake. A true Key Lime Pie should be made with nothing more than lime juice, egg yolks and condensed milk and, in the oldest recipes, this pie wasn't even oven-baked - the chemical reaction between the lime juice and the condensed milk was enough to 'cook' it.

The other thing to note is that yer actual Key Limes are often not dissimilar to lemons in appearance, albeit smaller, so the green colouring is hopelessly misleading. If any additional colour is needed for a Key Lime Pie, it should be yellow, not green. This one is very pale, but still green... and the little pieces of lime zest on the top are definitely green.

Waitrose attempt, therefore, is another one for the "It's Not Really Key Lime Pie" column. Nice as the 'gingercrumb' base is, it should have been proper pie crust. Sharp and limey as the flavour is, the mousse is all wrong. As a lime cheesecake, this is absolutely wonderful... But that's not what they're calling it.

All of which makes me think that, considering how simple the traditional recipe is, I should really attempt to make a Key Lime Pie myself. Of course, it's highly unlikely that I'll be able to buy any Key limes in any of my local shops, or even the larger supermarkets further afield, so I'll just have to make do with the normal kind.

Then again, considering how simple the traditional recipe is, I wonder why so few people actually follow it...